
Photo by Stephen Phillips – Hostreviews.co.uk on Unsplash
You want to launch a website, and everyone’s throwing WordPress at you. It’s trusted by millions, runs everything from small blogs to massive brands, and now, it’s your turn. Great—until you open a guide and feel like you’ve landed in a tech maze. But here’s what most guides skip over: installing WordPress isn’t just a technical step—it’s your entry point into building something real online.
This guide won’t throw jargon at you or assume you know the backend of a server. It breaks it down, start to finish, with the why behind every how. Because once you get that, you’re not just installing WordPress—you’re building with purpose.
Table of Content:
WordPress is one of the most popular content management systems available today, powering over 43% of all websites on the internet.
Known for its user-friendly interface and versatility, WordPress allows anyone—from beginners to seasoned developers—to create and manage a website effortlessly.
Whether you’re looking to build a blog, a business website, an online store, or a personal portfolio, WordPress offers a wealth of features and a vast library of plugins and themes to help you customize your site to fit your exact needs.
Its open-source nature and supportive community make it a go-to choice for millions of users worldwide.
Steps to Prepare for Installing WordPress
Before starting the installation process, you should complete these key steps. Taking care of these tasks beforehand will make the installation smoother and ensure you are fully prepared.
- Get Web Server Access: Before installing WordPress, ensure you have access to a web server, which is software that hosts and delivers your website to visitors. The server stores and processes your site data, making it accessible online.Popular hosting providers most people choose are Bluehost, WP Engine or SiteGround that already runs a server.If you’re using a hosting provider, ensure it meets WordPress’ basic requirements:
- PHP version 7.2 or greater
- MySQL version 5.6 or greater OR MariaDB version 10.0 or greater
- HTTPS support
- Get an FTP Client: FTP (File Transfer Protocol) is how you’ll upload, download, and manage your WordPress files on your server. Many hosting providers handle this for you, but if needed, you can use an FTP client like FileZilla to manage the files manually.
- Download the Latest WordPress Version: To get started, download the most recent version of WordPress from their official website. This ensures you have all the latest features and security updates.
How to install Wordpress
WordPress makes installation easy. Regardless of the method you choose, the whole process should take roughly five minutes. Our recommendation is to go with a hosting provider that offers automatic WordPress installation, as it’s the most straightforward. However, the choice is ultimately yours.
Choose Your Hosting Provider
Before installing WordPress, the first step is to select a hosting provider.
Your hosting provider is essentially the foundation that stores all of your website’s files and data, allowing it to be accessible on the internet.
There are numerous hosting providers available, each offering different plans based on your requirements. Some popular hosting options are Bluehost or WP Engine.
To begin, select a hosting plan that aligns with your needs.
For beginners, a basic shared hosting plan usually works perfectly. After choosing a provider, proceed with signing up, and make sure to pick a domain name if you don’t have one yet.
Manual Installation Using FTP
With so many hosting providers offering automatic WordPress installations and cPanel auto-installers, manually installing WordPress via FTP is generally unnecessary. However, if you prefer this method, you can follow these steps.
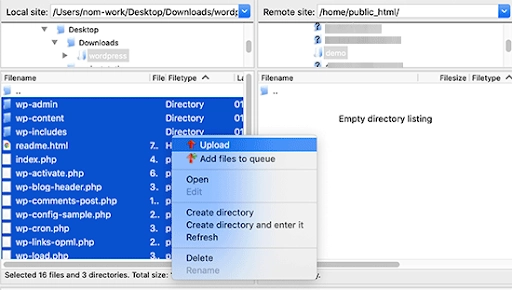
Step 1: First, download an FTP program like SmartFTP or FileZilla. Then, visit the WordPress website and download the latest version of the CMS.
Step 2: Unzip the WordPress file you just downloaded, and upload it to your public directory, typically named ‘public_html‘.
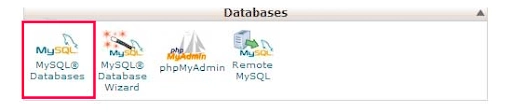
Step 3: Go to your cPanel and locate the “MySQL Databases” button. The layout may vary slightly, but it should be easy to find. Enter your desired database name and click “Create Database.”
Step 4: After creating the database, you’ll need to create a user for it. Set a username and password, then click “Create User” Grant that user full access to your newly created database.
Step 5: On the next page, assign privileges to the user. Ensure all the privileges are checked to grant full access.
At this point, your FTP transfer should be complete. Visit your domain to finalize the installation. If the upload was successful, WordPress will prompt you to select your preferred language.
Step 6: Select your preferred language and click “Continue.”
Step 7: Enter your Database “Name”, “Username”, “Password”, “Database Host”, and “Table Prefix”. When done, click “Submit”.
Step 8: Click “Run the Install” You’ll then be prompted to provide WordPress with your admin information, including your “Site Title”, “Username” “Password”, and “Email”.

Step 9: Click “Install WordPress” You can now log into WordPress using your username and password.
Congratulations! You’ve successfully completed the manual WordPress installation.
To do things after Installation
Configure Your Website
Once WordPress is installed, it’s time to start configuring your website. Log into your admin dashboard. This dashboard is where you’ll manage your entire website, from adding content to customizing the look.
-
- Select a Theme: WordPress comes with a default theme, but you can change it to better match your vision. Go to “Appearance > Themes” in the left-hand menu and choose from thousands of free and premium themes. Click “Add New” to explore.
<li”>Install Plugins: Plugins extend WordPress’s functionality. For instance, you can use plugins for SEO (like Yoast SEO), security (such as Wordfence), and contact forms (like WPForms). To install plugins, click on “Plugins > Add New,” search for the plugin you need, and click “Install Now.”
Customize Your Settings
Customizing the settings helps you tailor your website experience for both yourself and your visitors.
- General Settings: Go to “Settings > General.” Here you can change your site title, tagline, and time zone. Make sure this information represents your site well.
- Permalink Structure: Under “Settings > Permalinks,” set your permalink to something SEO-friendly, like “Post name.” This makes your URLs look clean and easier for search engines to understand.
Create Essential Pages
With WordPress ready to go, it’s time to create a few key pages that every website should have:
- Home Page: This will be the main page that visitors see when they come to your site.
- About Page: This page tells visitors who you are and what your site is about.
- Contact Page: Make it easy for people to reach you by including a contact form. Plugins like WPForms or Contact Form 7 make this simple.
- Blog Page: If you plan on blogging, WordPress allows you to create a dedicated page that will automatically display your latest posts.
Secure Your Website
Security is vital for keeping your website safe from potential threats.
- Use Strong Passwords: Make sure your admin password is strong. Avoid easy-to-guess options.
- Install a Security Plugin: Plugins like Wordfence and Sucuri can add extra layers of protection to your site, making it more difficult for hackers to gain access.
- Enable Backups: Regular backups will save you if anything goes wrong. Plugins like UpdraftPlus allow you to schedule backups automatically.
Start Adding Content
With your basic setup complete, it’s time to add content. WordPress makes this super simple:
- Posts vs. Pages: WordPress uses two main types of content—Posts and Pages. Posts are typically used for blog entries, while Pages are used for static content (like “About” or “Contact”).
- Create Your First Post: To add a new post, go to “Posts > Add New.” You can give your post a title, add text, images, and even embed videos.
Optimize for Search Engines
For your website to get noticed, you’ll need to optimize it for search engines.
- Install an SEO Plugin: Plugins like Yoast SEO help you optimize your content with helpful tips and tricks. They guide you on keywords, readability, and meta descriptions.
- Submit Your Site to Google: Google Search Console helps you track your website’s performance and ensure it’s properly indexed by Google. Once your site is ready, submit your sitemap to Google.
Launch Your Website
Once you’re happy with the content and the look of your website, it’s time to launch. Announce it to friends, family, or even on social media. The key is to spread the word and get your website in front of as many eyes as possible.
Conclusion
You just took a huge step toward bringing your business online—and that’s no small thing. Setting up WordPress means you now have full control over how your brand shows up in the world.
Whether you’re building a portfolio, launching a service, or growing an e-commerce store, your foundation is officially set.
Next up: Let’s talk design. Head to our guide on installing a WordPress theme and start building a site that looks as professional as the business behind it.
-
While many hosting providers offer automatic WordPress installation options that don’t require an FTP client, you may need an FTP program like FileZilla if you prefer manual installation or need more control over your website files.


")

